Steam rising, pan gently rattling, and then the dreaded pop: sausage skins split, fat escapes and dinner looks defeated.
Home cooks have tried pricking, grilling, simmering and swearing at sausages, yet a very small tweak in the pan quietly solves most of the drama: adding a little vinegar to the cooking water. Behind that simple trick sits some surprisingly solid food science.
Why sausages burst so easily in the pan
When sausages split, the sausage isn’t usually “bad” and the casing isn’t necessarily low quality. The problem is almost always excessive heat.

Inside every sausage there is water, fat and proteins. As the temperature rises, these expand. If the water is boiling hard, the interior heats very quickly, faster than the casing can stretch. Pressure builds, the skin tightens, and the casing finally tears, sending juices straight into the water instead of onto your plate.
Gentle heat keeps pressure under control inside the sausage, giving the casing a chance to stretch instead of explode.
The type of casing also matters. Many modern sausages use collagen casings or reconstituted materials rather than traditional natural intestines. Collagen softens, then weakens, as it approaches temperatures close to 95°C (203°F). At that point, any sudden spike in internal pressure becomes risky.
Heating methods that make or break your sausages
- Vigorous boiling: High turbulence, rapid expansion inside the sausage, high risk of splitting.
- Gentle simmering: More even heating, slower expansion, casing stays intact more often.
- Just-heated water for pre-cooked sausages: Ideal for hot dogs and fully cooked links, which only need warming, not full cooking.
- Controlled temperature: Lower stress on the casing, better moisture retention in the filling.
In other words, the noisy pan is usually the wrong pan. A quiet one does better work.
What vinegar actually does in the cooking water
Kitchen vinegar, whether white wine vinegar or plain distilled, is typically around 5% acetic acid with a pH of about 2.5. Even a spoonful or two in a saucepan of water changes the chemistry enough to affect how the sausage casing behaves.
A small dose of acid subtly alters the sausage casing and the cooking water, making splitting less likely and the kitchen less smelly.
How acid affects the casing
The casing is made mostly of proteins, especially collagen. Proteins react to changes in acidity. In slightly more acidic water, the outer layer of the casing can tighten and stabilise just enough to hold together better during heating. This doesn’t turn the skin into armour, but it nudges the texture in a helpful direction: less rubbery, more uniform, and less prone to sudden tears.
This is why adding more and more vinegar doesn’t keep improving the result. Too much acid will start to toughen flavours and can make everything taste sharp. The sweet spot is a small adjustment, not a pickle brine.
Cleaning up sausage smells
Vinegar also has a useful side effect: odour control. Some of the stronger cooking smells from processed meats come from basic compounds such as amines. In an acidic environment, these react with the acid and turn into less volatile salts. That means fewer aggressive, lingering aromas clinging to curtains and clothing.

The result is a milder, cleaner smell while the sausages cook and after you’ve finished eating.
Four key benefits of using vinegar
- Lower chance of bursting, as the acid-treated surface is slightly more stable.
- More pleasant texture, with a casing that feels smoother rather than bouncy or leathery.
- Better flavour balance, with a light acidity cutting through salt and fat.
- Reduced cooking odours, thanks to fewer volatile, basic compounds escaping into the air.
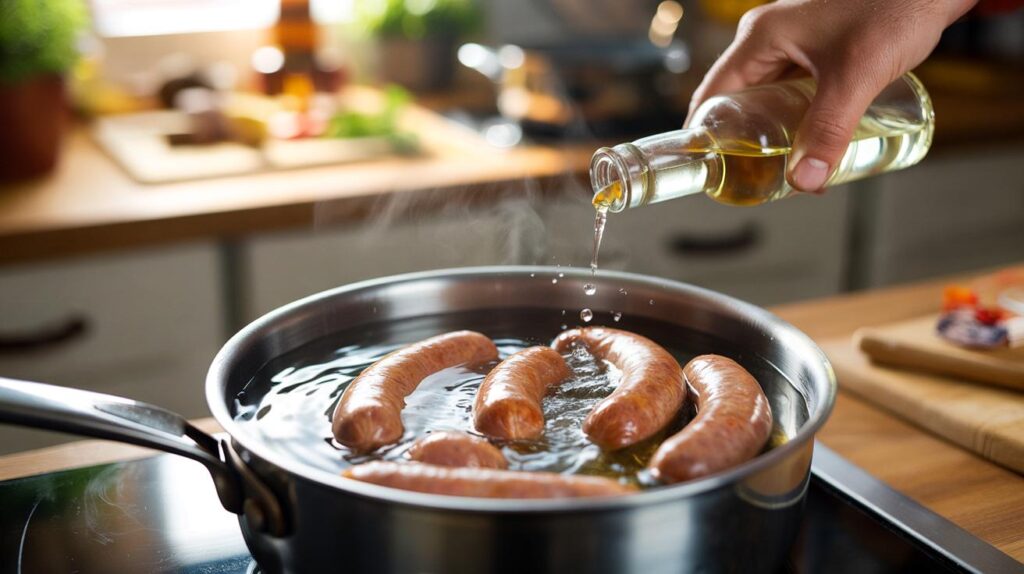
How to use the vinegar trick step by step
Order matters: water first, temperature second, sausages last. The vinegar goes in right at the beginning.
Use roughly one tablespoon of vinegar per litre of water: enough to work, not enough to turn dinner sour.
Practical method for everyday sausages
- Start with a saucepan of cold water.
- Add about 1 tablespoon of vinegar for every litre of water.
- Heat the water gently until it is hot but not at a rolling boil. A light shimmer on the surface is about right.
- Once the temperature is steady, add the sausages.
- Cook over low heat for around 5–8 minutes, depending on size, keeping the water below a vigorous boil.
This method works for hot dog sausages, pork links, bratwurst and poultry sausages. It’s particularly effective when you care about a smooth, intact casing and juicy interior.
Ideal temperature and timing for sausage safety and flavour
Most supermarket sausages labelled “pre-cooked” or “fully cooked” do not need to be blasted. They just need to reach a safe internal temperature of around 74°C (165°F). For raw sausages, the target is similar, but the heat must stay on long enough for the centre to cook through.
| Type of sausage | Typical status | Target internal temperature | Suggested method |
|---|---|---|---|
| Hot dog / frankfurter | Pre-cooked | 74°C / 165°F | Heat gently in vinegar water 3–5 minutes |
| Fresh pork sausage | Raw | 74°C / 165°F | Simmer in vinegar water 8–12 minutes, then brown if desired |
| Chicken or turkey sausage | Often pre-cooked | 74°C / 165°F | Low simmer 5–8 minutes to reheat safely |
| Bratwurst | Varies | 74°C / 165°F | Gentle poach in vinegar water, optional finish on grill |
Hard boiling for long periods doesn’t add safety once that temperature is reached. It simply punishes the casing and squeezes out moisture you’d rather taste.
Extra tips for better sausages, with and without vinegar
Vinegar in the water is one tool. A calmer cooking style is the other. For those only pan-frying or grilling, some principles still apply.
- Bring sausages closer to room temperature before cooking to reduce shock from extreme heat.
- Start in a cooler pan and raise the heat gradually instead of dropping them into a smoking-hot surface.
- Avoid pricking the skins: it lets the fat leak out, drying the sausage and encouraging flare-ups on the grill.
- For very thick sausages, pre-simmer in vinegar water, then finish on a grill or skillet for colour.
For those curious about the science terms: “collagen” is the structural protein that gives the casing its strength and snap. When heated carefully, it softens in a way that feels pleasant to bite. When overheated or shocked by rapid expansion, it loses integrity and tears. Acidity and controlled heat together help shepherd that transition.
There are a few risks worth mentioning. Adding far too much vinegar can push the flavour into pickled territory and may clash with delicately seasoned sausages. Very long cooking, even at low temperature, can still dry out lean poultry sausages, because they contain less fat to protect the texture. For anyone sensitive to acidic foods, using slightly less vinegar or choosing a milder type, like rice vinegar, keeps the effect gentler.
Once you understand how the casing, the filling and the water interact, the method becomes easy to adapt. Cooking a big batch for a party? Poach everything gently with vinegar first, hold them warm, then quickly colour them on a grill as guests arrive. Trying to reduce smells in a small flat? Keep a lid on the pan, use the vinegar, and you’ll have far less lingering sausage fog by the time the washing-up starts.