The familiar click of the radiator turning on promises warmth, but the air still feels thin and dry. As the wind howls outside, tapping the windows with a reminder of the season’s chill, the room remains warm yet uncomfortable. Your throat feels scratchy, your skin tight, and your nose constantly teeters on the edge of a sneeze.
Homemade Eyebrow Gel
It was at this moment that a memory surfaced—something an older relative had once mentioned or perhaps something read online about placing a glass of water near a radiator to make the room feel warmer. It sounded improbable, almost like an old wives’ tale. However, with the dryness becoming more noticeable, you filled a glass of water and set it near the radiator. Slowly, imperceptibly, the room began to feel different, as though winter had subtly revealed its effects.
The Science Behind a Simple Glass of Water
The idea that a glass of water could improve comfort without increasing heating costs seems almost too simple to be true. Water doesn’t create heat. Instead, it works by helping your body feel the warmth that’s already present. While the radiator warms the room, it also pulls moisture from the air. At first, this lack of humidity is easy to ignore, but soon it shows up as dry skin, a scratchy throat, or static shocks from metal surfaces. What’s less obvious is how this dryness affects how we perceive temperature.

How Dry Air Affects Perceived Warmth
Your body is constantly exchanging heat with the environment. In dry air, moisture evaporates quickly from your skin and lungs, causing your body to lose heat, which results in a cooling effect—even if the room itself is warm. The radiator may be doing its job, but your body doesn’t fully agree with it. A glass of water, placed near the radiator, allows the moisture to evaporate gently, raising the humidity just enough to make the air feel softer and more comfortable.
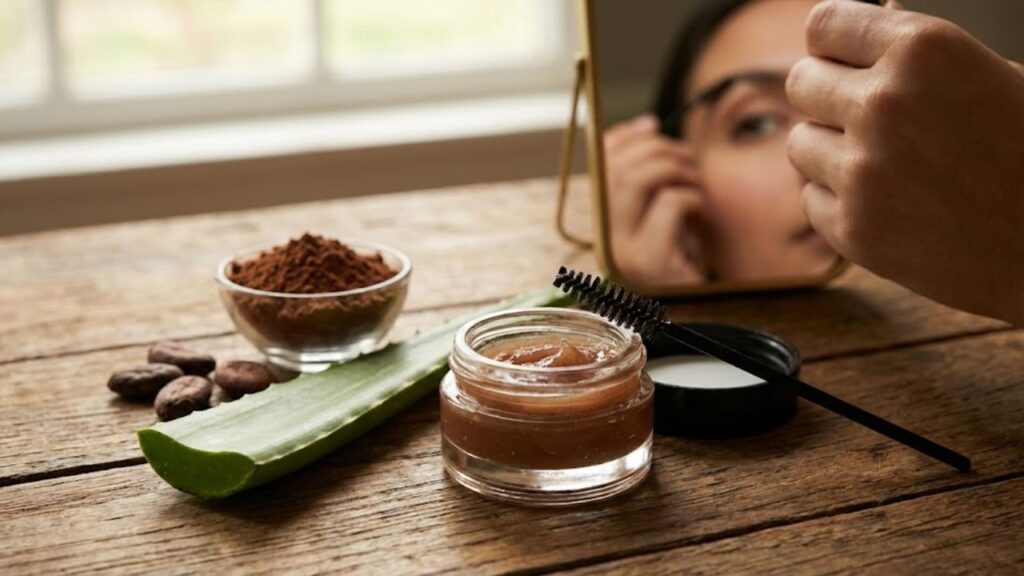
Aloe Vera for Gentle Brow Control
Aloe vera has long been used for its soothing properties, especially for skin care. In its pure form, the gel is light, non-sticky, and cool. When applied to the eyebrows, it offers gentle control without stiffness. Aloe serves as the base for a homemade brow gel, providing light-to-medium hold that keeps brow hairs in place while still allowing them to move naturally.
Cocoa Powder for Subtle Brow Definition
Cocoa powder, with its soft brown tones, enhances eyebrows naturally, creating depth and warmth. When mixed with aloe vera, it produces a gentle stain-like effect rather than a bold, painted finish. The amount used determines the result—a pinch gives a subtle enhancement, while a little more deepens the shade. The result is a natural, blended look, perfectly complementing your brows without harsh lines.
How to Make Your Own Brow Gel
Creating brow gel at home is a peaceful, hands-on experience. You don’t need much—just a clean jar, a small spoon, and a spoolie brush. The process is more about creating with care than rushing through it. At its simplest, the gel consists of just two ingredients: aloe vera gel and cocoa powder. You can add jojoba oil for smoothness or coffee or charcoal for a deeper shade, but the beauty lies in the simplicity.
 Forget the French bob, this bob haircut will be the trendiest in 2026 according to experts
Ingredients for Homemade Brow Gel
- Aloe vera gel (2 teaspoons): Provides natural hold, smooth application, and moisture.
- Unsweetened cocoa powder (¼–½ teaspoon): Adds natural color to define brows.
- Small glass jar: For mixing and storing the gel.
- Spoolie or angled brow brush: For applying and shaping the gel.
- Mini spoon or mixing stick: To blend ingredients smoothly.
Mixing the Brow Gel
Start by spooning aloe vera gel into the clean jar. Sprinkle in the cocoa powder and stir gently, pressing out any clumps as you go. The gel will slowly transform into a smooth, earthy brown. Test the color on the back of your hand, and let it dry briefly. Adjust the shade by adding more cocoa powder for a deeper color or more aloe for a lighter, softer texture. The final consistency should be creamy and smooth, thick enough to cling to a brush but not heavy.
Applying the Brow Gel
To apply, start with clean, dry brows. Lightly dip the spoolie into the gel, removing any excess. Brush through your brows using short, gentle strokes that follow the natural direction of hair growth. Begin at the inner brow and work outward. For added definition, let the first layer dry before applying another, focusing on areas that need more fill. An angled brush can help mimic individual hairs for precision. The finish should remain soft and flexible, never stiff or harsh.
Why Homemade Beauty Solutions Matter
Making your own beauty products encourages mindfulness. It reduces waste, limits unnecessary additives, and allows you to reconnect with the act of creating. Each homemade jar replaces a disposable tube, and each application reaffirms that beauty doesn’t need to be complicated. With natural solutions, you can customize the formula to suit your skin’s needs, patch-test adjustments as needed, and slow down to enjoy the process.
In the moment, as you apply the cocoa-scented gel, you realize that beauty can be simple, personal, and rooted in intention. Sometimes, the most effective solutions are the simplest ones.